New Feature: Dates Per Class

One of the things that Tournr has missed for a while is the ability to set the date a particular class will run on, this has typically been OK, but can be a bit confusing. Particularly if you register for a class that takes place on a Sunday, but the competition as a whole is running over the entire weekend.

From today, an organiser can now set the date for a given class. In both adding or editing a class you can now set the date:

Set Date on a Class

There are a couple of rules:

  • the date of the class has to be on or after the start date of your competition
  • the date of the class has to be on or before the end date of your competition

Once you’ve done this, the competitor (or potential competitor)  will be able to see the date on the class, and also in the email they get for a successful registration. Which will look like this:

Date being shown on an email

In this example, I didn’t set the date for the 1.5Km class, hence no date showing. I would recommend you set the date for all your classes if you need to, to avoid confusion.

New Feature – Copying and Moving Competitors

Copying or moving competitors is something that Tournr (until now) has lacked, there are actually a lot of reasons why you might want to:

  • Someone registered for the wrong class by accident (Move)
  • On the day someone actually decided to take part in another class as well (Copy)
  • A class with multiple ‘sub classes’ might want to be split out to give individual positions

We’ll focus on the last case, as it covers the others as well.

I’ve recently run a Handicap class in my competition:

image

The class had a mixture of men and women taking part, but I’d not provided a way for Men and Women to take part in separate classes. At the time, I didn’t think I’d get enough people to justify separate classes. However, I’ve got the handicap scores, and I’ve worked out that I can provide a Men’s and Women’s individual ranking.

First off, I add two new classes – Ladies and Mens

image

The old solution to this would be to press the ‘Add Competitor’ buttons to add the names of the competitors, which would provide the position information to anyone looking at the page – but the problem with that is that as a competitor, when you log on to Tournr you can’t see your positions, and Tournr itself can’t apply rankings as it doesn’t know who the anonymous competitors actually are.

The new and much better approach is to use the competitor menu:

image

and select ‘Copy to another class’, this will open another page to allow you to copy the selected competitor (and others) to a new class:

image

Once ‘Copy’ is pressed you can see Alice and Charlotte are now in both Ladies and Handicap.

image

Not only does this mean the positions are correctly attributed to the right people, but it also saves a lot of typing, and the same deal for the men:

image

Results in:

image

New Feature–PayPal Carts!

Up until now, Tournr has let organisers use PayPal for registration costs, so 1 class, 2 classes – all the way to n classes, with an additional class option thrown in for good measure, and that works for a lot of the time. But sometimes you want just a little more, maybe you’re needing to add an ‘Insurance for the day’ type option, or an ‘Extra Meal Ticket’. Tournr didn’t help you with that :( but now – it does!

You can now use a cart based system instead, so you can have as many extra items on as you want, plus the registration costs. How does it work? Let me show you.

The technique is the same for either editing an existing Tournament, or creating a new one, when you’re on the create/edit page, make sure you have the ‘Add payment details’ check box selected:

image

Then select ‘Use PayPal’

image

and then select ‘Use a PayPal Cart`:

image

Now you can start to add Cart Items, as many as you want:

image

You can add new items by pressing the ‘Add another item’ button, or remove them by pressing the red ‘X’ next to each row. Fill in all the other details as you would for a normal PayPal buy now button (see the previous post if you need help there) and ‘Save’ the competition.

When you scroll down to your new/edited competitions ‘Payment details’ section, you’ll see:

image

Competitors can add each item to the cart and when ready, ‘View Cart’ to pay.

New Feature: Types

Tournr has never really cared about the type of your competition, it’s quite happy to run anything with you and that is still the case today. But! If you want to give your classes types, well now you can!

This isn’t a huge feature, but it’s needed for a couple of things that are coming up that I promise you will be very nifty indeed. So, on to the show and tell.

What is a Type?

A type is a classification of your class, by the sport or game type, it can be a broad classification (e.g. Kayak) to specific (e.g. K-1 Sprint 500m) though ideally, the more concise the better.

How do I set a Type?

As always, login and go to your tournament. In there go down to your classes, and click on ‘edit’ to change the class you want to add a type to:

image

There is a new text box called ‘Type’, click in there and type in the name of the type you want to classify your class as.

image

You’ll get a loading indicator whilst Tournr searches for valid matches, and if it finds any, it will show them to you on the screen:

image

When you save and go back to your classes you’ll see the type next to the class name:

image

To remove your type, simply edit the class again and delete the type then save!

Now, of course Tournr hasn’t got every sport, not even close (in fact at the time of writing, we’ve got the Olympic Kayak / Canoe and surf classes), so what happens if the class you want isn’t listed?

Just type it in, Tournr might give you suggestion as to what it thinks you mean, but you are free to ignore it!

image

Results in:

image

These custom entries won’t show up in the Tournr suggestions initially as they need to be approved by an administrator of the site. If we’ve missed something please feel free to use the feedback link to let us know!

Why do this?

I hinted at a couple of things that I can do when I have this information, firstly (and I think pretty importantly) I’d like to be able to search by sport / game type, to be able to filter all the tournaments by type would be very handy for competitors, once you have that you can do some other things (one of which will be very soon and I don’t want to ruin the surprise).

Just to make it clear: You don’t have to set this at all, you can leave all classes without types and Tournr will work just fine, but I think it will help in the long run.

Tournr Tips #8 – PayPal

IMPORTANT NOTE!! This tip is now out of date – please see PayPal Integration to integrate PayPal.


The description part of a competition allows you to embed most things you can find on the internet. Handily this also applies to PayPal, quite often these days competitions like to take money via PayPal – there are lots of reasons, competitors can use credit cards or bank accounts to make payments and in a safe way. It also allows an organiser to manage the payments, issue refunds without having to post off a cheque. Not having to deal with Cheques is a big plus point in itself!

Generally – PayPal has 2 ways to send payments, the first is you put an email address in and ‘send’ your payment via that address, the downside to that scenario is that someone can easily mistype an email – not everyone can copy/paste (for example, reading from a phone screen whilst typing into a webpage), and some characters 0 and O (that’s ‘zero’ and the letter ‘o’) can easily be mixed up.

The second way generally seen is via the PayPal button – which is ace, as you can even go the whole hog and create a cart system.

image

Tournr will work equally well with both, but in this post I’m just going to show how to do the button code, as typing an email address is easy, and you already know how to do that!

To use buttons, you do need to have Premier or Business account with PayPal. This allows you to accept credit cards etc, I believe (and it’s been a long time since I’ve done it) you need to verify your account, PayPal is very good at helping you with this, so I’ll leave it to them.

If you have a premier or business account already, then we’re good to go, and we want to go to the button factory – (that link takes you to the UK version, but I imagine it will redirect to the region you are in). You have a choice of 5 button types, In principle you can embed any of them, but we’re only really interested in the ‘Buy Now’ and ‘Add To Cart’ buttons. You can use either for doing most of the cases you’re going to be looking at, with you needing to do slightly more to use the ‘Cart’ button, but we’ll cross that bridge a little further down.

Buy Now

Buy Now is most appropriate for a competition with one class, or just a set entrance fee. It’s a simple one click payment option. You can also use it for multiple classes if you have a simple set up.

From the ‘button factory’ select the Create your button now link, if you’re not logged in you will be asked to.

image

Here you can choose a different button type (if you’ve changed your mind), but we’ll stick with the current one. The next thing to fill in is the ‘Item name’, generally, to make life easier, it’s best to stick in the name of your competition. If you regularly run the ‘British Open’ it’s worth putting the name as something like ‘British Open 2014’ so you can distinguish it from the next time you run it – you can use the Item ID for this as well, so something like BO2014 might be appropriate.

image

If you have only one entry, then add in the price (and choose your currency), then press Create Button. If you have more than one type of entry, let’s do some customising!

We have 2 options, a drop-down with or without prices. You’d use the without prices option if you’re looking at a single price, but multiple options – i.e. a competitor can only take part in one class. Most likely you’re looking for the option with prices.

Just fill in the payment details, and this is entirely up to you. Let’s say we allow competitors to enter up to 3 classes, the first class we charge at £10, and each subsequent class is only £5 we might setup our button to look like this:

image

Which results in a button like:

image

Next we can skip the 2nd and 3rd steps of the button factory (by all means look at them and see if there is anything you want to do – one thing that can be handy is to restrict the number of entries allowed using the ‘Track Inventory’ option).

We want to press the ‘Create Button’ button now:

image

Now you are taken to a page called ‘Add your button code to your webpage’ which is handy, as that’s what we want to do. You’ll see a box with a ‘Website’ tab, what you want to do is copy that code and paste it into your ‘Description’ of your competition:

image

(Where the red arrow is)

image

Which when you save will give you this on your competition page:

image

The competitor can now press the ‘Buy Now’ button, and PayPal deals with the rest.

Add To Cart

Add To Cart is most appropriate for a multiple-class competition, where competitors can enter in multiple classes, or where you need to have optional extras such as ‘day insurance’.

It’s a very similar process to the one above, you can decide to have one button per price point, so you might have a ‘First Class’ button where the price is £10 then a second button for subsequent classes, which is set at £5, the choice as they say is yours (though please email me if you want advice on what to do, I’ll be more than happy to help!).

In this case – you’ll add multiple buttons using the same approach as you would for the ‘Buy Now’ button. The only extra thing you need to do is create a ‘View Cart’ button, which you can see as an option at the bottom of the page when you ‘Create’ your cart button:

image

This doesn’t really have any options, and is a straight copy/paste job.

Tournr Tips #7 – Embedding things

The description part of a competition can be more than plain text, it actually uses a type of text entry called ‘MarkDown’ (you can find out more about that by clicking on that link), which is becoming a standard in forums and messaging boards. It allows you to put bullets, headings etc, but without having to learn HTML.

One of the nice things about that is that you aren’t restricted to just text, you can embed other things, such as YouTube videos, Vimeo.

How?

This demo is with YouTube, but the same principle exists for pretty much all the media sites, if you have difficulty, please feel free to email me via the site and I’ll get you working!

First, let’s find the video we want to embed, for demo purposes I’ve gone with the Shoreline Triathlon (see it here: https://www.youtube.com/watch?v=jCHwieXHhrY). What we need is the embed code. To get that, go to the video page, and click on the ‘Share’ link:

image

Next, choose the ‘Embed’ option:

image

Below this, you have some options you can play around with, I’d stick with the default settings, but feel free to play around with the video size.

When you’re all happy, select the code in the text box (it should begin <iframe), right click on it (or whatever the equivalent is in the Mac world) and select ‘Copy’:

image

Go to your Competition on Tournr, and Select Edit:

image

In the ‘description’ field, paste the code you just copied from YouTube.

image

Save your tournament:

image

And now you have your video in the competition!

image

Recap

Look for the ‘Share’ link on a page you want to show in Tournr, look for the Embed code and copy and paste it into the description field of your Competition.

By the way – this will also work for Groups, Terms and Conditions etc, which is pretty cool!

Introducing Basic Ranking

So, Tournr has been adding bits here and there, mostly in a lead up to this change – the ability to automatically work out rankings for a given group.

Word of warning – there are some caveats to use ranking in it’s current form (they will be ironed out soon) – I’ll list them at the bottom, but first let me show you the what.

Ranking wise, I’ve initially developed a Basic Ranking system based on the 1998 BCU rules (kindly supplied by Peter Blenkinsop) – I’m sure there is a better name, but this is what I’m going with now.

How is the ranking calculated?

The maximum number of points available to any given competitor is 100, so 1st place will always get 100 points. From here on in, each subsequent competitor earns using the following formula:

equation

So in a competition of 2 people, the scores would look like:

Position Score
1 100
2 (100/2) * (2-2+1) = (50 * 1) = 50

For 3:

Position Score
1 100
2 (100/3) * (3-2+1) = (33.3 * 2) = 67 (rounded)
3 (100/3) * (3-3+1) = (33.3 * 1) = 33 (rounded)

You get the idea. The scores from the competitions are added together, and the highest total is 1st overall, the lowest is last.

Over the course of 5 competitions (for example) typically, you pick your best N competitions (with the BCU this is 3), this allows you to a) discount a bad day (we all have them) and b) not have to attend all the competitions in a given year, which if they are over a disparate locations, or indeed you just happen to be on holiday – is a good thing.

It also encourages you to take part in more than one competition, as turning up and taking part can get you a higher rank than just doing well in one competition (bold indicates the ‘best’ 3 scores):

Name Comp1 Comp2 Comp3 Comp4 Comp5 Total Rank
Andy 1st/100 1st/100 200 3
Bruce 3rd/50 2nd/67 1st/100 4th/25 1st/100 267 1
Charlotte 2nd/75 1st/100 3rd/33 3rd/50 2nd/67 242 2
Danielle 4th/25 3rd/33 2nd/67 2nd/75 3rd/33 175 4

Andy wins all the competitions he’s in, but both Bruce and Charlotte get a higher overall ranking as they have a third score which adds to their total.

The system works when there are draws, as you simply give two people the same ranking,  so if both Andy and Charlotte have the same score, then they share the rank, with Bruce and Danielle following:

Name Score Rank
Andy 250 1
Bruce 175 4
Charlotte 250 1
Danielle 205 3

How do I use this?

First, you need to have a group, a group in Tournr has rankings, as a group is the only way to group together competitions. Once you have your group you need to add your competitions (see Tips #6), then we enter new territory.

Setting the Ranking

Not every competition is ranked, and we need to be able to deal with that, by default when you add a competition to your group it’s not ranked, so first we need to click on the ‘details’ button of our added tournament:

image

Once on the details page, we can see the competition is not ranked,

image

to change that, we click on the ‘Not ranked’ button and get a new ‘Ranked’ button.

image

(You can simply click the Ranked button again to change it back to being not ranked). When we go ‘Back to Group’ we can see our competition is now ranked.

image

Once you’ve done that for all your competitions, the next stage is to add a some Ranking details. Here you decide the period of time to rank for and how many competitions to select for the top ‘N’.

First, click on the ‘Add a ranking’ button

image

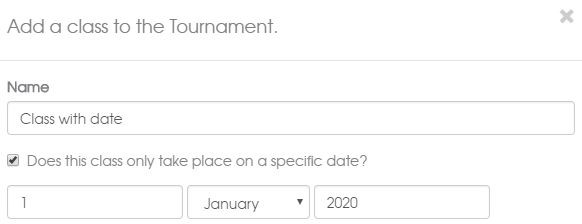
As an example, for a ranking for all of 2014 with only the top 3 results counting, you would put in:

image

That’s it, now your ranking will show up.

image

Clicking on the name of the ranking will take you to the ranking page:

image

Clicking on ‘how is this worked out’ link will take you to a page describing the ranking process:

image

One thing to note (if you get no results) you might need to finalise (see Tip #4) your competitions for the rankings to take effect, this is so Tournr knows the results have been set.

The Future

Ranking wise – this is the beginning, I’ve primarily done the Basic system as this is the area I’m most comfortable with, I plan on implementing other systems (Elo for example) over time, and depending on what people want most. Please contact me directly if you have an idea or something is awry!

The caveats

So, as I said up top, there are some caveats (at the time of writing) to using the ranking, they’re not to onerous, and they will be solved shortly, but I wanted to get a version out sooner rather than later.

Class Names:

At present, you will need to name your classes the same across all the ranked competitions, so if in one competition the Open is called Super-Open, it won’t be matched to another competition which has the Open called Open. I’m working on a solution to allow an administrator to define the classes that are ranked, and then allow them to map a competition specific class to a ranking class.

Competitors:

If you’re a registered competitor on Tournr, then there are no problems, your rank will be correct, the problem lies with anonymous users, or specifically, users an organiser has added themselves. The trouble is whether John Smith in one competition is the same John Smith in another competition. I’ve made a judgement call for the time being that YES, if two people in two competitions are called the same, then they are the same person from the point of view of ranking – this does take into account any ‘Alias’ you might have assigned someone. So, as with the Class Names above – if the names differ, I can’t tell if they are supposed to be the same person, for example:

Competition 1 – Open Class – John Smith
Competition 2 – Open Class – Jon Smith

As far as the system is concerned they are different people, and so will be ranked differently.

New Feature – Multiple Organisers

Tournr has always had the ability to have multiple organisers, but up until now you’ve needed to ask me to set it up for you, which – let’s face it – is not ideal. Well, no longer!

It works in the same way as inviting does, you invite people (via email address) to your competition, but the form has changed and now allows you to ‘Invite as an organiser’

image

The recipient will get a link to click on that will register them as an organiser (they do need to have an account and be logged on).

The new organiser will have exactly the same permissions as you do, they can edit the competition how they want, they can add new competitors, add results, even delete the competition, so be careful!

New Feature – Private Competitions & Inviting

Tournr is proud to add a new feature:

Private Competitions

There are a few reasons why you might want private competitions, firstly you might want to play around with a competition (or the site!) but not have your efforts viewable to everyone, or you might just want to have a competition with your friends.

How to set the privacy

First off, you need to create a competition (or indeed edit an existing one), you’ll notice the checkbox under the competition name:

image

Simply, if checked – then it’ll be private, if left blank then it’ll be public.  It’s the same if you’re editing an existing tournament:

image

Obviously, unchecking the box will make your tournament public.

What does it mean?

Your tournament will not be searchable, or get-to-able by anyone you personally haven’t invited. When you look at your competition it will say ‘private’ next to the name:

image

On the home page, you will see a padlock next to your private competitions:

image

If someone goes to your competition, and they are not allowed in (or aren’t logged in) they will see this page:

image

Inviting

A competition of 1 does not make for a lot of fun (although you do win all the time, so there is an upside!) – so you’ll want to invite people.

You invite via the ‘cog’ menu in the top right hand corner:

image

You fill in the form that pops up:

image

NB. It’s a semi-colon (;) delimited list of email addresses.

Press the ‘Send Invites’ button and away you go. The invitees will get an email asking them to come along and see the competition. Invitees do have to have an account on the site to see your competition, and the invite code they get is a one-time-use code, once they’ve used it no-one else can use it.

When you have invited people you can see who you’ve invited on your competition page (only organisers can see this):

image

The numbers mean I have sent 1 invite, and I’ve had 0 people accept.

I have two choices with the invite, the ‘resend’ button will resend the original invite, the ‘delete’ button will delete the invitation – so if the invitee does click on the link in the email – they still won’t be able to see the competition (useful if you put the wrong email address in by accident).

If someone accepts an invitation to a private competition all it means is that they can see the competition, they are not automatically registered to compete or anything, so you can quite easily invite people just to spectate the competition, or maybe just to view it to give you feedback before you make it public.

You can see who has accepted via the ‘Invites’ section of the Tournament Page:

image

Invitation Side Effect (or plus point)

One of the nice things about the invitation system is that it will also work for non-private competitions, so you can invite people to see your competition via the ‘cog’ menu in exactly the same way as above.

The main difference is that users will be sent just a link to your competition as no invite code is needed.

What if I want to go Private from Public?

Good question – Anyone who is registered to compete will still be able to see the competition, as will any organisers. People who have just looked at the competition in the past will not be able to see the competition anymore without and invite.

Questions?

As always – just ask either email or comment and I will be happy to help!