IMPORTANT NOTE!! This tip is now out of date – please see PayPal Integration to integrate PayPal.
The description part of a competition allows you to embed most things you can find on the internet. Handily this also applies to PayPal, quite often these days competitions like to take money via PayPal – there are lots of reasons, competitors can use credit cards or bank accounts to make payments and in a safe way. It also allows an organiser to manage the payments, issue refunds without having to post off a cheque. Not having to deal with Cheques is a big plus point in itself!
Generally – PayPal has 2 ways to send payments, the first is you put an email address in and ‘send’ your payment via that address, the downside to that scenario is that someone can easily mistype an email – not everyone can copy/paste (for example, reading from a phone screen whilst typing into a webpage), and some characters 0 and O (that’s ‘zero’ and the letter ‘o’) can easily be mixed up.
The second way generally seen is via the PayPal button – which is ace, as you can even go the whole hog and create a cart system.
Tournr will work equally well with both, but in this post I’m just going to show how to do the button code, as typing an email address is easy, and you already know how to do that!
To use buttons, you do need to have Premier or Business account with PayPal. This allows you to accept credit cards etc, I believe (and it’s been a long time since I’ve done it) you need to verify your account, PayPal is very good at helping you with this, so I’ll leave it to them.
If you have a premier or business account already, then we’re good to go, and we want to go to the button factory – (that link takes you to the UK version, but I imagine it will redirect to the region you are in). You have a choice of 5 button types, In principle you can embed any of them, but we’re only really interested in the ‘Buy Now’ and ‘Add To Cart’ buttons. You can use either for doing most of the cases you’re going to be looking at, with you needing to do slightly more to use the ‘Cart’ button, but we’ll cross that bridge a little further down.
Buy Now
Buy Now is most appropriate for a competition with one class, or just a set entrance fee. It’s a simple one click payment option. You can also use it for multiple classes if you have a simple set up.
From the ‘button factory’ select the Create your button now link, if you’re not logged in you will be asked to.
Here you can choose a different button type (if you’ve changed your mind), but we’ll stick with the current one. The next thing to fill in is the ‘Item name’, generally, to make life easier, it’s best to stick in the name of your competition. If you regularly run the ‘British Open’ it’s worth putting the name as something like ‘British Open 2014’ so you can distinguish it from the next time you run it – you can use the Item ID for this as well, so something like BO2014 might be appropriate.
If you have only one entry, then add in the price (and choose your currency), then press Create Button. If you have more than one type of entry, let’s do some customising!
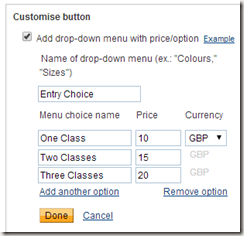
We have 2 options, a drop-down with or without prices. You’d use the without prices option if you’re looking at a single price, but multiple options – i.e. a competitor can only take part in one class. Most likely you’re looking for the option with prices.
Just fill in the payment details, and this is entirely up to you. Let’s say we allow competitors to enter up to 3 classes, the first class we charge at £10, and each subsequent class is only £5 we might setup our button to look like this:
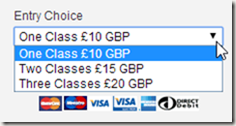
Which results in a button like:
Next we can skip the 2nd and 3rd steps of the button factory (by all means look at them and see if there is anything you want to do – one thing that can be handy is to restrict the number of entries allowed using the ‘Track Inventory’ option).
We want to press the ‘Create Button’ button now:
Now you are taken to a page called ‘Add your button code to your webpage’ which is handy, as that’s what we want to do. You’ll see a box with a ‘Website’ tab, what you want to do is copy that code and paste it into your ‘Description’ of your competition:
(Where the red arrow is)
Which when you save will give you this on your competition page:
The competitor can now press the ‘Buy Now’ button, and PayPal deals with the rest.
Add To Cart
Add To Cart is most appropriate for a multiple-class competition, where competitors can enter in multiple classes, or where you need to have optional extras such as ‘day insurance’.
It’s a very similar process to the one above, you can decide to have one button per price point, so you might have a ‘First Class’ button where the price is £10 then a second button for subsequent classes, which is set at £5, the choice as they say is yours (though please email me if you want advice on what to do, I’ll be more than happy to help!).
In this case – you’ll add multiple buttons using the same approach as you would for the ‘Buy Now’ button. The only extra thing you need to do is create a ‘View Cart’ button, which you can see as an option at the bottom of the page when you ‘Create’ your cart button:
This doesn’t really have any options, and is a straight copy/paste job.


