ECheque Tips

PayPal has a system called ‘eCheques’ – basically – they allow payment to come from someone’s bank account if they don’t have a debit / credit card – this can be a good thing, but can also be bad.

From Tournr’s point of view, if you take payment by eCheque – the competitor will not be registered until the cheque has cleared which can take up to 14 days according to PayPal. This is problematic if you take payment on the weekend before your competition and payment hasn’t cleared by the start. Even worse is that the payment doesn’t clear!

Solutions

There are a couple of solutions – the first is to set the last registration date to be 14 days before your competition. This means you can take any form of payment, but does mean your competitors have to be super on it.

The second solution is to not accept eCheques. To do that – you need to go to your PayPal account and click on ‘Seller Preferences’

image

Once there, click on the ‘update’ button of ‘Block Payments’:

image

And then select the check box to block eCheques:

image

Finally – press ‘Save’ and you’re done:

image

Tournr – Payments Updates

Partly to do the Teams feature addition, and partly to simplify things, the payments setup has been moved to another page, you can get there in a few ways –

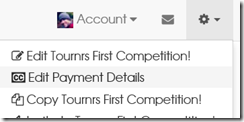
One – by selecting ‘Edit payment details’ from the cog in the top right of the page:

image_thumb8

Two – pressing the ‘edit’ icon next to the Payment details:

image_thumb9

or three, from the normal ‘Edit’ page you can press the ‘Edit the payment details’ button:

image_thumb10

When you first get there, you will have the option to make the competition free, or say you want to charge:

image

Selecting ‘Charge’ will open up a whole new set of options.

Basic Details

image

Use the notes field as before to put any details in (address for cheques etc) – bear in mind – this is publicly available information, so be careful with what you put there!

PayPal Setup

image

Selecting ‘I want to use PayPal to take payments’ will provide you with the paypal setup fields, the most important is the email address. NB: I’ve made it so that you can only use PayPal with ‘Register on Payment’ – so you can’t use PayPal buttons anymore.

Individual Entrants Setup

Here you decide whether or not to charge for individual entrant classes. If you do decide to charge, you get the usual options from before:

image

Additional Items

If you’re adding things like T-Shirts, or meals you can add them here, so they are available for a competitor to select at checkout:

image

Team Entrants Setup

You can charge entry for teams in one of two ways – firstly by charging for each class entered (as individuals are charged):

image

Or a single flat rate fee which means one team can enter multiple classes:

image

Early Bird Prices

Early bird pricing works as before, but you now have the option to set for teams or individuals (or both):

image

Discount Codes

Discount codes also now have the option to set for Team or Individuals.

image

New Feature–PayPal Carts!

Up until now, Tournr has let organisers use PayPal for registration costs, so 1 class, 2 classes – all the way to n classes, with an additional class option thrown in for good measure, and that works for a lot of the time. But sometimes you want just a little more, maybe you’re needing to add an ‘Insurance for the day’ type option, or an ‘Extra Meal Ticket’. Tournr didn’t help you with that :( but now – it does!

You can now use a cart based system instead, so you can have as many extra items on as you want, plus the registration costs. How does it work? Let me show you.

The technique is the same for either editing an existing Tournament, or creating a new one, when you’re on the create/edit page, make sure you have the ‘Add payment details’ check box selected:

image

Then select ‘Use PayPal’

image

and then select ‘Use a PayPal Cart`:

image

Now you can start to add Cart Items, as many as you want:

image

You can add new items by pressing the ‘Add another item’ button, or remove them by pressing the red ‘X’ next to each row. Fill in all the other details as you would for a normal PayPal buy now button (see the previous post if you need help there) and ‘Save’ the competition.

When you scroll down to your new/edited competitions ‘Payment details’ section, you’ll see:

image

Competitors can add each item to the cart and when ready, ‘View Cart’ to pay.

Tournr Tips #9 – Payment without PayPal

I recently wrote about how to add PayPal to Tournr, but what if you don’t want to use PayPal? Prefer cheques? Prefer BACS? – Of course we can do that!

First things first – we’ve got to be logged in, then let’s head to our tournament and edit it:

image

Scroll to the ‘Add Payment Details’ section, and select ‘Add payment details’:

image

Add in your information in the ‘Notes’ field (you can use MarkDown if you want):

image

Lastly, ensure that the ‘Use PayPal’ check box is left off.

image

Then press ‘Save’

image

Then on the tournament page you will have a payment section:

image

Just a quick couple of tips for formatting the text as above, when editing your text, to get each bit on a new line put 2 spaces at the end of the preceding line. To get italics, surround what you want to be italicised with single ‘*’ characters (like *this*). To get bold, use 2 ‘*’ characters (like **this**).

Paypal and YouTube/Vimeo integration

Turns out that letting anyone embed whatever they want into a webpage is a bit of a security risk, whilst it’s super handy to embed youtube / paypal etc, there is too much risk. So, as of 1pm today Tournr stopped allowing you to embed YouTube / Paypal in the way I’d previously shown.

But it’s too important to be able to use PayPal and YouTube to not have it there. So there is a solution to the problem, and hopefully it’s way better than before anyhow :) We’ll start with the two simple things, YouTube and Vimeo.

Embedding YouTube

To embed a YouTube video all you need is the identifier of the video, you can get this from the address bar of your browser when you’re looking at the video:

image

The bit surrounded by red in the picture, you copy that exactly (case does matter in this instance) and add it to your description by wrapping it with the tags: [yt]

For example:

[yt]kFsZo-xw9Dk[yt]

will display as:

image

Embedding Vimeo

Pretty much the same deal as YouTube above, the main difference is the tags are [vim] instead. The Vimeo ID is a number at the end of the url, again, in the address bar of your browser:

image

So,

[vim]113311298[vim]

will display as:

image

PayPal Integration

This is the biggest change, in the past I’ve suggested going to the PayPal website and generating a button then pasting that button into the Description field. It’s a bit of a disconnect to have to jump to PayPal to generate a button, then back to Tournr. So now, as part of competition creation (or indeed editing) you can add payment details and Tournr will automagically generate the button code for you.

So, when you come to edit or create a competition you’ll see a checkbox entitled ‘Add payment details?’, by default this is not selected, and if you don’t add any (or if you uncheck this at a later date) no payment details will be displayed on the site.

image

If you do check the box, all the options for payment will appear:

image

So let’s take this field by field:

Notes: This is text that appears above the button, allowing you to specify instructions, or (indeed if you’re not using PayPal) how to pay.

Email address for payments: The email address PayPal will send to. If you get this wrong paypal won’t accept a payment, if you get someone else’s email address – then someone else will get the payment, be extra careful with this!

Item Name / Item Code: These are codes for you to see what someone has paid for, if you leave them empty, they will be set to defaults of ‘<your competition name> Registration’

Number of classes to show: The number of classes to allow registration for on the button, if competitors can register for only 2 classes, set this to 2.

Currency: 3 options, £,  € or $

Cost of registering for one class: This is the first class cost

Cost of registering for another class: This is for subsequent classes, if you leave this blank, the price of the first class will be used.

Show additional class option: This allows the paypal button to have one more option of ‘Additional Class’ which will be at the cost of registering for another class.

Additional Text Field: Use this if you want some extra detail from paying competitors (T-Shirt size for example)

Visible to unregistered competitors?: If checked, then you don’t have to be registered to be able to see the pay button.

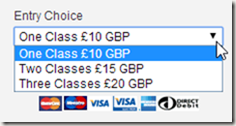
The example picture above results in the following button:

image

and:

image

if I change the number of classes to ‘10’, I end up with this:

image

This removes the need to go to PayPal and generate buttons, and creates a specific ‘Payment Details’ section on your competition page, making it clearer to competitors how to pay.

Tournr Tips #8 – PayPal

IMPORTANT NOTE!! This tip is now out of date – please see PayPal Integration to integrate PayPal.


The description part of a competition allows you to embed most things you can find on the internet. Handily this also applies to PayPal, quite often these days competitions like to take money via PayPal – there are lots of reasons, competitors can use credit cards or bank accounts to make payments and in a safe way. It also allows an organiser to manage the payments, issue refunds without having to post off a cheque. Not having to deal with Cheques is a big plus point in itself!

Generally – PayPal has 2 ways to send payments, the first is you put an email address in and ‘send’ your payment via that address, the downside to that scenario is that someone can easily mistype an email – not everyone can copy/paste (for example, reading from a phone screen whilst typing into a webpage), and some characters 0 and O (that’s ‘zero’ and the letter ‘o’) can easily be mixed up.

The second way generally seen is via the PayPal button – which is ace, as you can even go the whole hog and create a cart system.

image

Tournr will work equally well with both, but in this post I’m just going to show how to do the button code, as typing an email address is easy, and you already know how to do that!

To use buttons, you do need to have Premier or Business account with PayPal. This allows you to accept credit cards etc, I believe (and it’s been a long time since I’ve done it) you need to verify your account, PayPal is very good at helping you with this, so I’ll leave it to them.

If you have a premier or business account already, then we’re good to go, and we want to go to the button factory – (that link takes you to the UK version, but I imagine it will redirect to the region you are in). You have a choice of 5 button types, In principle you can embed any of them, but we’re only really interested in the ‘Buy Now’ and ‘Add To Cart’ buttons. You can use either for doing most of the cases you’re going to be looking at, with you needing to do slightly more to use the ‘Cart’ button, but we’ll cross that bridge a little further down.

Buy Now

Buy Now is most appropriate for a competition with one class, or just a set entrance fee. It’s a simple one click payment option. You can also use it for multiple classes if you have a simple set up.

From the ‘button factory’ select the Create your button now link, if you’re not logged in you will be asked to.

image

Here you can choose a different button type (if you’ve changed your mind), but we’ll stick with the current one. The next thing to fill in is the ‘Item name’, generally, to make life easier, it’s best to stick in the name of your competition. If you regularly run the ‘British Open’ it’s worth putting the name as something like ‘British Open 2014’ so you can distinguish it from the next time you run it – you can use the Item ID for this as well, so something like BO2014 might be appropriate.

image

If you have only one entry, then add in the price (and choose your currency), then press Create Button. If you have more than one type of entry, let’s do some customising!

We have 2 options, a drop-down with or without prices. You’d use the without prices option if you’re looking at a single price, but multiple options – i.e. a competitor can only take part in one class. Most likely you’re looking for the option with prices.

Just fill in the payment details, and this is entirely up to you. Let’s say we allow competitors to enter up to 3 classes, the first class we charge at £10, and each subsequent class is only £5 we might setup our button to look like this:
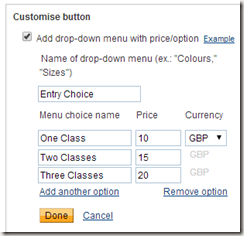
image

Which results in a button like:

image

Next we can skip the 2nd and 3rd steps of the button factory (by all means look at them and see if there is anything you want to do – one thing that can be handy is to restrict the number of entries allowed using the ‘Track Inventory’ option).

We want to press the ‘Create Button’ button now:

image

Now you are taken to a page called ‘Add your button code to your webpage’ which is handy, as that’s what we want to do. You’ll see a box with a ‘Website’ tab, what you want to do is copy that code and paste it into your ‘Description’ of your competition:

image

(Where the red arrow is)

image

Which when you save will give you this on your competition page:

image

The competitor can now press the ‘Buy Now’ button, and PayPal deals with the rest.

Add To Cart

Add To Cart is most appropriate for a multiple-class competition, where competitors can enter in multiple classes, or where you need to have optional extras such as ‘day insurance’.

It’s a very similar process to the one above, you can decide to have one button per price point, so you might have a ‘First Class’ button where the price is £10 then a second button for subsequent classes, which is set at £5, the choice as they say is yours (though please email me if you want advice on what to do, I’ll be more than happy to help!).

In this case – you’ll add multiple buttons using the same approach as you would for the ‘Buy Now’ button. The only extra thing you need to do is create a ‘View Cart’ button, which you can see as an option at the bottom of the page when you ‘Create’ your cart button:

image

This doesn’t really have any options, and is a straight copy/paste job.