New Feature: Dates Per Class

One of the things that Tournr has missed for a while is the ability to set the date a particular class will run on, this has typically been OK, but can be a bit confusing. Particularly if you register for a class that takes place on a Sunday, but the competition as a whole is running over the entire weekend.

From today, an organiser can now set the date for a given class. In both adding or editing a class you can now set the date:

Set Date on a Class

There are a couple of rules:

  • the date of the class has to be on or after the start date of your competition
  • the date of the class has to be on or before the end date of your competition

Once you’ve done this, the competitor (or potential competitor)  will be able to see the date on the class, and also in the email they get for a successful registration. Which will look like this:

Date being shown on an email

In this example, I didn’t set the date for the 1.5Km class, hence no date showing. I would recommend you set the date for all your classes if you need to, to avoid confusion.

ECheque Tips

PayPal has a system called ‘eCheques’ – basically – they allow payment to come from someone’s bank account if they don’t have a debit / credit card – this can be a good thing, but can also be bad.

From Tournr’s point of view, if you take payment by eCheque – the competitor will not be registered until the cheque has cleared which can take up to 14 days according to PayPal. This is problematic if you take payment on the weekend before your competition and payment hasn’t cleared by the start. Even worse is that the payment doesn’t clear!

Solutions

There are a couple of solutions – the first is to set the last registration date to be 14 days before your competition. This means you can take any form of payment, but does mean your competitors have to be super on it.

The second solution is to not accept eCheques. To do that – you need to go to your PayPal account and click on ‘Seller Preferences’

image

Once there, click on the ‘update’ button of ‘Block Payments’:

image

And then select the check box to block eCheques:

image

Finally – press ‘Save’ and you’re done:

image

New Feature: Calendar

Tournr has always been developed according to what people ask for – so if you ask for something – generally you’ll get it!

To that end someone asked if we could get a calendar into Tournr – to put things other than just competitions. Well – now you can!

Calendars are based around Organisations – so first you need an organisation, luckily – I have one!

https://tournr.com/organisation/tournr

On there, you’ll now see a link to ‘our calendar’:

image

Off we go…

image

Oh dear. No events :(

Let’s add one!

image

You get the usual form to fill in for an event, you can set the date and the Name, location etc:

image

and you can set the type of event:

image

If the event you’re adding is on Tournr, you can skip all this and select the check box at the top:

image

Then you enter the ID of the competition:

image

So for example, I’ve added ‘406’ – which is the Shoreline Handicap Surf Classic competition, this is then added to the calendar like this:

image

And if you click on it you get taken to:

image

You can then add it to you calendar:

image

Which will go into your preferred calendar option!

New Feature – Copying and Moving Competitors

Copying or moving competitors is something that Tournr (until now) has lacked, there are actually a lot of reasons why you might want to:

  • Someone registered for the wrong class by accident (Move)
  • On the day someone actually decided to take part in another class as well (Copy)
  • A class with multiple ‘sub classes’ might want to be split out to give individual positions

We’ll focus on the last case, as it covers the others as well.

I’ve recently run a Handicap class in my competition:

image

The class had a mixture of men and women taking part, but I’d not provided a way for Men and Women to take part in separate classes. At the time, I didn’t think I’d get enough people to justify separate classes. However, I’ve got the handicap scores, and I’ve worked out that I can provide a Men’s and Women’s individual ranking.

First off, I add two new classes – Ladies and Mens

image

The old solution to this would be to press the ‘Add Competitor’ buttons to add the names of the competitors, which would provide the position information to anyone looking at the page – but the problem with that is that as a competitor, when you log on to Tournr you can’t see your positions, and Tournr itself can’t apply rankings as it doesn’t know who the anonymous competitors actually are.

The new and much better approach is to use the competitor menu:

image

and select ‘Copy to another class’, this will open another page to allow you to copy the selected competitor (and others) to a new class:

image

Once ‘Copy’ is pressed you can see Alice and Charlotte are now in both Ladies and Handicap.

image

Not only does this mean the positions are correctly attributed to the right people, but it also saves a lot of typing, and the same deal for the men:

image

Results in:

image

New Feature – Teams

This has been a major update to Tournr, it’s required some hefty changes and I think it’s for the better, but really that’s for you to decide!

Firstly, a brief overview – Tournr has always run individual based competitions – and done so relatively well, an individual competitor can register, unregister and well, keep track of their scores. What you couldn’t do was register a team. Up until recently, this wasn’t a huge issue as no-one was running a team based event, but I noticed one competition running an individuals weekend event on Tournr, and a teams based event via a PDF and PayPal!

So – the goal was to remove that PDF and get everything onto Tournr, to be able to make it one place to go to register rather than two.

I’m pleased to announce (as you might have guessed from the title) that Tournr now has this. So without further ado:

Adding a Team Class

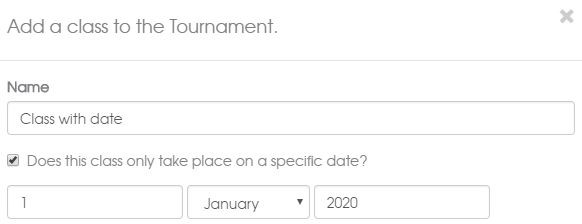
This is done in exactly the same way as adding an individual class, the difference being you check the ‘Do you want this to be a Team class?’ checkbox:

image

and you’ll get some extra options pop up:

image

  • Size of team – this is the maximum size of a given team (not including any reserves).
  • Number of reserves – this is the number of reserves – this plus the ‘size of team’ gives you the full size.
  • Extra restrictions – a place for you to note if there are any extra restrictions for your class
  • Age Restriction checkbox – allows you to set an age restriction on a team class (this will be coming to normal classes soon!)

image

So if you have a juniors class, you can restrict entry to people who are aged 18 or under on the 1st of January 2017 like so:

image

Setting your prices

This is one of the major changes to current Tournr methods – Payment details are now edited on a separate page from the normal setup pages.

Please read this post: Payments Update to get more information on what you can set!

Registering a team

First choose to register a team!

image

This will take you to the team registration page, where you fill in the general things your team needs:

image

And then you fill in the classes you want to register for – because this is a juniors class and we set the age restriction – we have to set the date of birth for these competitors:

image

Once that’s all filled in, pressing ‘Register’ will register the team (if you need to pay you’ll get taken to the PayPal page), you will then see the team registered on the page:

image

Tournr – Payments Updates

Partly to do the Teams feature addition, and partly to simplify things, the payments setup has been moved to another page, you can get there in a few ways –

One – by selecting ‘Edit payment details’ from the cog in the top right of the page:

image_thumb8

Two – pressing the ‘edit’ icon next to the Payment details:

image_thumb9

or three, from the normal ‘Edit’ page you can press the ‘Edit the payment details’ button:

image_thumb10

When you first get there, you will have the option to make the competition free, or say you want to charge:

image

Selecting ‘Charge’ will open up a whole new set of options.

Basic Details

image

Use the notes field as before to put any details in (address for cheques etc) – bear in mind – this is publicly available information, so be careful with what you put there!

PayPal Setup

image

Selecting ‘I want to use PayPal to take payments’ will provide you with the paypal setup fields, the most important is the email address. NB: I’ve made it so that you can only use PayPal with ‘Register on Payment’ – so you can’t use PayPal buttons anymore.

Individual Entrants Setup

Here you decide whether or not to charge for individual entrant classes. If you do decide to charge, you get the usual options from before:

image

Additional Items

If you’re adding things like T-Shirts, or meals you can add them here, so they are available for a competitor to select at checkout:

image

Team Entrants Setup

You can charge entry for teams in one of two ways – firstly by charging for each class entered (as individuals are charged):

image

Or a single flat rate fee which means one team can enter multiple classes:

image

Early Bird Prices

Early bird pricing works as before, but you now have the option to set for teams or individuals (or both):

image

Discount Codes

Discount codes also now have the option to set for Team or Individuals.

image

Early Bird Prices!

No – don’t worry – Tournr isn’t charging anyone – but what it does now allow is for Organisers to be able to set Early Bird Prices.

Eh?

An early bird price is a price that is lower than the normal full price, it’s a way to get more people to your competition, and earlier.

Ok, how?

As with most things – the Cog is your friend – click on that and select ‘Edit’

image

Scroll down to the Payment Details Section – (I’m going to make an assumption here that you’ve got payments setup, if not please see the older posts about that)

Just after the settings for the costs you’ll see a new checkbox (Include Early Bird Prices):

image

If you select this you’ll be able to add as many prices as you want – if you want different prices for each day – go for it!

image

Like so:

image

Scroll to the bottom and Save. All done!

What does it do?

You get a new panel showing the Early Bird Prices:

image

And the ‘Classes’ drop down will reflect the current early bird deal:

image

New Feature–PayPal Carts!

Up until now, Tournr has let organisers use PayPal for registration costs, so 1 class, 2 classes – all the way to n classes, with an additional class option thrown in for good measure, and that works for a lot of the time. But sometimes you want just a little more, maybe you’re needing to add an ‘Insurance for the day’ type option, or an ‘Extra Meal Ticket’. Tournr didn’t help you with that :( but now – it does!

You can now use a cart based system instead, so you can have as many extra items on as you want, plus the registration costs. How does it work? Let me show you.

The technique is the same for either editing an existing Tournament, or creating a new one, when you’re on the create/edit page, make sure you have the ‘Add payment details’ check box selected:

image

Then select ‘Use PayPal’

image

and then select ‘Use a PayPal Cart`:

image

Now you can start to add Cart Items, as many as you want:

image

You can add new items by pressing the ‘Add another item’ button, or remove them by pressing the red ‘X’ next to each row. Fill in all the other details as you would for a normal PayPal buy now button (see the previous post if you need help there) and ‘Save’ the competition.

When you scroll down to your new/edited competitions ‘Payment details’ section, you’ll see:

image

Competitors can add each item to the cart and when ready, ‘View Cart’ to pay.

Tournr Tips #9 – Payment without PayPal

I recently wrote about how to add PayPal to Tournr, but what if you don’t want to use PayPal? Prefer cheques? Prefer BACS? – Of course we can do that!

First things first – we’ve got to be logged in, then let’s head to our tournament and edit it:

image

Scroll to the ‘Add Payment Details’ section, and select ‘Add payment details’:

image

Add in your information in the ‘Notes’ field (you can use MarkDown if you want):

image

Lastly, ensure that the ‘Use PayPal’ check box is left off.

image

Then press ‘Save’

image

Then on the tournament page you will have a payment section:

image

Just a quick couple of tips for formatting the text as above, when editing your text, to get each bit on a new line put 2 spaces at the end of the preceding line. To get italics, surround what you want to be italicised with single ‘*’ characters (like *this*). To get bold, use 2 ‘*’ characters (like **this**).

New Feature – Attachments!

Tournr is designed to allow an organiser to organise a competition and have all the bits & bobs that go with it easy to fill in and then display to the competitor. But sometimes you just need that bit extra, maybe a Menu for that post competition meal, maybe a handicap form – really the options on that front are limitless!

Until now, an organiser has been limited to either copying the text of a doc and putting it into the description field, or saying something like ‘Email me for the form’. Neither of which is a good solution, as it means the organiser has to still be involved and may as well drop back to the traditional spreadsheet & email option. So let me introduce…

Attachments!

As an organiser you can now add any number of attachments to your tournament, you can make each attachment visible to everyone, competitors or even just organisers. Let me show you how.

First step is to login and go to your competition, once there, scroll down below the Description section, and you should see an Attachments section.

image

Pressing the ‘+’ button will take you to the ‘Add Attachment’ page:

image

Press ‘Browse’ and select the file you want, this will then display in the box:

image

You can type any description you want, this will appear next to the attachment (for those in the know – you can use MarkDown here if you want)

The next two options are who (other than the Organisers) can see the attachment:

  1. Visible to anyone
    If this is set, anyone can see the attachment. They don’t need to be logged in or a competitor.
  2. Visible to competitors
    If this is set and Visible to anyone isn’t set, then only competitors and organisers can see the attachment.

If neither of the options is selected, then only organisers can see the attachments.

We hit ‘Save’ and now we can see the attachment in the tournament:

image

As I’m an organiser – I can delete the attachment (using the ‘bin’ icon), and all anyone else has to is click on the name to download the file.

Limitations

  • File size is currently limited to 2Mb, let me know if this is an issue or you need to upload bigger.
  • File types are limited – this means you can’t upload .exe, .bat, .cmd etc files (and the rest of the usual suspects).