New Feature: Dates Per Class

One of the things that Tournr has missed for a while is the ability to set the date a particular class will run on, this has typically been OK, but can be a bit confusing. Particularly if you register for a class that takes place on a Sunday, but the competition as a whole is running over the entire weekend.

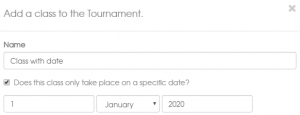
From today, an organiser can now set the date for a given class. In both adding or editing a class you can now set the date:

Set Date on a Class

There are a couple of rules:

  • the date of the class has to be on or after the start date of your competition
  • the date of the class has to be on or before the end date of your competition

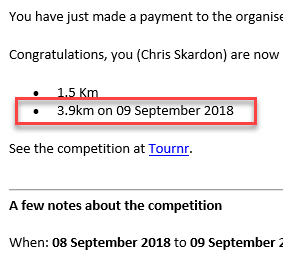
Once you’ve done this, the competitor (or potential competitor)  will be able to see the date on the class, and also in the email they get for a successful registration. Which will look like this:

Date being shown on an email

In this example, I didn’t set the date for the 1.5Km class, hence no date showing. I would recommend you set the date for all your classes if you need to, to avoid confusion.

New Feature: Calendar

Tournr has always been developed according to what people ask for – so if you ask for something – generally you’ll get it!

To that end someone asked if we could get a calendar into Tournr – to put things other than just competitions. Well – now you can!

Calendars are based around Organisations – so first you need an organisation, luckily – I have one!

https://tournr.com/organisation/tournr

On there, you’ll now see a link to ‘our calendar’:

image

Off we go…

image

Oh dear. No events :(

Let’s add one!

image

You get the usual form to fill in for an event, you can set the date and the Name, location etc:

image

and you can set the type of event:

image

If the event you’re adding is on Tournr, you can skip all this and select the check box at the top:

image

Then you enter the ID of the competition:

image

So for example, I’ve added ‘406’ – which is the Shoreline Handicap Surf Classic competition, this is then added to the calendar like this:

image

And if you click on it you get taken to:

image

You can then add it to you calendar:

image

Which will go into your preferred calendar option!

New Feature – Copying and Moving Competitors

Copying or moving competitors is something that Tournr (until now) has lacked, there are actually a lot of reasons why you might want to:

  • Someone registered for the wrong class by accident (Move)
  • On the day someone actually decided to take part in another class as well (Copy)
  • A class with multiple ‘sub classes’ might want to be split out to give individual positions

We’ll focus on the last case, as it covers the others as well.

I’ve recently run a Handicap class in my competition:

image

The class had a mixture of men and women taking part, but I’d not provided a way for Men and Women to take part in separate classes. At the time, I didn’t think I’d get enough people to justify separate classes. However, I’ve got the handicap scores, and I’ve worked out that I can provide a Men’s and Women’s individual ranking.

First off, I add two new classes – Ladies and Mens

image

The old solution to this would be to press the ‘Add Competitor’ buttons to add the names of the competitors, which would provide the position information to anyone looking at the page – but the problem with that is that as a competitor, when you log on to Tournr you can’t see your positions, and Tournr itself can’t apply rankings as it doesn’t know who the anonymous competitors actually are.

The new and much better approach is to use the competitor menu:

image

and select ‘Copy to another class’, this will open another page to allow you to copy the selected competitor (and others) to a new class:

image

Once ‘Copy’ is pressed you can see Alice and Charlotte are now in both Ladies and Handicap.

image

Not only does this mean the positions are correctly attributed to the right people, but it also saves a lot of typing, and the same deal for the men:

image

Results in:

image

Tournr – Payments Updates

Partly to do the Teams feature addition, and partly to simplify things, the payments setup has been moved to another page, you can get there in a few ways –

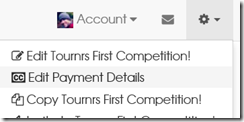
One – by selecting ‘Edit payment details’ from the cog in the top right of the page:

image_thumb8

Two – pressing the ‘edit’ icon next to the Payment details:

image_thumb9

or three, from the normal ‘Edit’ page you can press the ‘Edit the payment details’ button:

image_thumb10

When you first get there, you will have the option to make the competition free, or say you want to charge:

image

Selecting ‘Charge’ will open up a whole new set of options.

Basic Details

image

Use the notes field as before to put any details in (address for cheques etc) – bear in mind – this is publicly available information, so be careful with what you put there!

PayPal Setup

image

Selecting ‘I want to use PayPal to take payments’ will provide you with the paypal setup fields, the most important is the email address. NB: I’ve made it so that you can only use PayPal with ‘Register on Payment’ – so you can’t use PayPal buttons anymore.

Individual Entrants Setup

Here you decide whether or not to charge for individual entrant classes. If you do decide to charge, you get the usual options from before:

image

Additional Items

If you’re adding things like T-Shirts, or meals you can add them here, so they are available for a competitor to select at checkout:

image

Team Entrants Setup

You can charge entry for teams in one of two ways – firstly by charging for each class entered (as individuals are charged):

image

Or a single flat rate fee which means one team can enter multiple classes:

image

Early Bird Prices

Early bird pricing works as before, but you now have the option to set for teams or individuals (or both):

image

Discount Codes

Discount codes also now have the option to set for Team or Individuals.

image

Tournr Tips #9 – Payment without PayPal

I recently wrote about how to add PayPal to Tournr, but what if you don’t want to use PayPal? Prefer cheques? Prefer BACS? – Of course we can do that!

First things first – we’ve got to be logged in, then let’s head to our tournament and edit it:

image

Scroll to the ‘Add Payment Details’ section, and select ‘Add payment details’:

image

Add in your information in the ‘Notes’ field (you can use MarkDown if you want):

image

Lastly, ensure that the ‘Use PayPal’ check box is left off.

image

Then press ‘Save’

image

Then on the tournament page you will have a payment section:

image

Just a quick couple of tips for formatting the text as above, when editing your text, to get each bit on a new line put 2 spaces at the end of the preceding line. To get italics, surround what you want to be italicised with single ‘*’ characters (like *this*). To get bold, use 2 ‘*’ characters (like **this**).

New Feature – Attachments!

Tournr is designed to allow an organiser to organise a competition and have all the bits & bobs that go with it easy to fill in and then display to the competitor. But sometimes you just need that bit extra, maybe a Menu for that post competition meal, maybe a handicap form – really the options on that front are limitless!

Until now, an organiser has been limited to either copying the text of a doc and putting it into the description field, or saying something like ‘Email me for the form’. Neither of which is a good solution, as it means the organiser has to still be involved and may as well drop back to the traditional spreadsheet & email option. So let me introduce…

Attachments!

As an organiser you can now add any number of attachments to your tournament, you can make each attachment visible to everyone, competitors or even just organisers. Let me show you how.

First step is to login and go to your competition, once there, scroll down below the Description section, and you should see an Attachments section.

image

Pressing the ‘+’ button will take you to the ‘Add Attachment’ page:

image

Press ‘Browse’ and select the file you want, this will then display in the box:

image

You can type any description you want, this will appear next to the attachment (for those in the know – you can use MarkDown here if you want)

The next two options are who (other than the Organisers) can see the attachment:

  1. Visible to anyone
    If this is set, anyone can see the attachment. They don’t need to be logged in or a competitor.
  2. Visible to competitors
    If this is set and Visible to anyone isn’t set, then only competitors and organisers can see the attachment.

If neither of the options is selected, then only organisers can see the attachments.

We hit ‘Save’ and now we can see the attachment in the tournament:

image

As I’m an organiser – I can delete the attachment (using the ‘bin’ icon), and all anyone else has to is click on the name to download the file.

Limitations

  • File size is currently limited to 2Mb, let me know if this is an issue or you need to upload bigger.
  • File types are limited – this means you can’t upload .exe, .bat, .cmd etc files (and the rest of the usual suspects).

Registration with Extra Details

Tournr has recently helped with the registration for the Ride Surf Kayak British Championships which has been a baptism of fire in many respects. As it stands there are 100 entries over 9 classes of competition, which is far and away the biggest event Tournr has been used for so far.

In doing so there were a couple of additions the guys at Ride wanted to be added for Tournr to be useful for them, so I’m going to introduce them to you.

Extra Registration Detail

They wanted the ability to record the BCU / CANI / WCA etc membership number of each competitor, (for the insurance of the event), Tournr initially didn’t cope with this as I’d only added email, phone and address as fields a competitor could have. The problem is that a football / scrabble / other competition isn’t going to want to have a BCU field, (they may have their own governing body though), and I didn’t want to have to restrict it to being just a ‘Governing body membership number’ field. So now we have an ‘Extra detail’ field. This can be anything you want:

image

When you set up your competition to have this field a competitor will see this when they register:

image

Which, by pressing the ‘eye’ (image) icon next to their name will show you all the details:

image

At the moment, there is only one dynamic registration field like this, there will be more at a later date.

Classes Button

Simple and should have been there from the start, but a quick way to get to the classes you want to register for is now provided by the ‘Classes’ button, to be found just under the title:

image

Documents

I’ve not really documented (ha!) much about these yet, as they primarily help Organisers a bit later on in the day, but in essence they provide an Excel (or plain CSV) file giving all the details of the competitors, useful for printing sign in sheets etc. I’ve also added the number of classes each competitor has entered to the ‘All Competitors List’.

image

New Feature: Types

Tournr has never really cared about the type of your competition, it’s quite happy to run anything with you and that is still the case today. But! If you want to give your classes types, well now you can!

This isn’t a huge feature, but it’s needed for a couple of things that are coming up that I promise you will be very nifty indeed. So, on to the show and tell.

What is a Type?

A type is a classification of your class, by the sport or game type, it can be a broad classification (e.g. Kayak) to specific (e.g. K-1 Sprint 500m) though ideally, the more concise the better.

How do I set a Type?

As always, login and go to your tournament. In there go down to your classes, and click on ‘edit’ to change the class you want to add a type to:

image

There is a new text box called ‘Type’, click in there and type in the name of the type you want to classify your class as.

image

You’ll get a loading indicator whilst Tournr searches for valid matches, and if it finds any, it will show them to you on the screen:

image

When you save and go back to your classes you’ll see the type next to the class name:

image

To remove your type, simply edit the class again and delete the type then save!

Now, of course Tournr hasn’t got every sport, not even close (in fact at the time of writing, we’ve got the Olympic Kayak / Canoe and surf classes), so what happens if the class you want isn’t listed?

Just type it in, Tournr might give you suggestion as to what it thinks you mean, but you are free to ignore it!

image

Results in:

image

These custom entries won’t show up in the Tournr suggestions initially as they need to be approved by an administrator of the site. If we’ve missed something please feel free to use the feedback link to let us know!

Why do this?

I hinted at a couple of things that I can do when I have this information, firstly (and I think pretty importantly) I’d like to be able to search by sport / game type, to be able to filter all the tournaments by type would be very handy for competitors, once you have that you can do some other things (one of which will be very soon and I don’t want to ruin the surprise).

Just to make it clear: You don’t have to set this at all, you can leave all classes without types and Tournr will work just fine, but I think it will help in the long run.

Tournr Tips #8 – PayPal

IMPORTANT NOTE!! This tip is now out of date – please see PayPal Integration to integrate PayPal.


The description part of a competition allows you to embed most things you can find on the internet. Handily this also applies to PayPal, quite often these days competitions like to take money via PayPal – there are lots of reasons, competitors can use credit cards or bank accounts to make payments and in a safe way. It also allows an organiser to manage the payments, issue refunds without having to post off a cheque. Not having to deal with Cheques is a big plus point in itself!

Generally – PayPal has 2 ways to send payments, the first is you put an email address in and ‘send’ your payment via that address, the downside to that scenario is that someone can easily mistype an email – not everyone can copy/paste (for example, reading from a phone screen whilst typing into a webpage), and some characters 0 and O (that’s ‘zero’ and the letter ‘o’) can easily be mixed up.

The second way generally seen is via the PayPal button – which is ace, as you can even go the whole hog and create a cart system.

image

Tournr will work equally well with both, but in this post I’m just going to show how to do the button code, as typing an email address is easy, and you already know how to do that!

To use buttons, you do need to have Premier or Business account with PayPal. This allows you to accept credit cards etc, I believe (and it’s been a long time since I’ve done it) you need to verify your account, PayPal is very good at helping you with this, so I’ll leave it to them.

If you have a premier or business account already, then we’re good to go, and we want to go to the button factory – (that link takes you to the UK version, but I imagine it will redirect to the region you are in). You have a choice of 5 button types, In principle you can embed any of them, but we’re only really interested in the ‘Buy Now’ and ‘Add To Cart’ buttons. You can use either for doing most of the cases you’re going to be looking at, with you needing to do slightly more to use the ‘Cart’ button, but we’ll cross that bridge a little further down.

Buy Now

Buy Now is most appropriate for a competition with one class, or just a set entrance fee. It’s a simple one click payment option. You can also use it for multiple classes if you have a simple set up.

From the ‘button factory’ select the Create your button now link, if you’re not logged in you will be asked to.

image

Here you can choose a different button type (if you’ve changed your mind), but we’ll stick with the current one. The next thing to fill in is the ‘Item name’, generally, to make life easier, it’s best to stick in the name of your competition. If you regularly run the ‘British Open’ it’s worth putting the name as something like ‘British Open 2014’ so you can distinguish it from the next time you run it – you can use the Item ID for this as well, so something like BO2014 might be appropriate.

image

If you have only one entry, then add in the price (and choose your currency), then press Create Button. If you have more than one type of entry, let’s do some customising!

We have 2 options, a drop-down with or without prices. You’d use the without prices option if you’re looking at a single price, but multiple options – i.e. a competitor can only take part in one class. Most likely you’re looking for the option with prices.

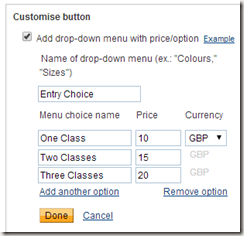
Just fill in the payment details, and this is entirely up to you. Let’s say we allow competitors to enter up to 3 classes, the first class we charge at £10, and each subsequent class is only £5 we might setup our button to look like this:
image

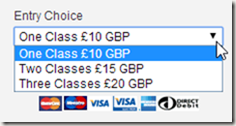
Which results in a button like:

image

Next we can skip the 2nd and 3rd steps of the button factory (by all means look at them and see if there is anything you want to do – one thing that can be handy is to restrict the number of entries allowed using the ‘Track Inventory’ option).

We want to press the ‘Create Button’ button now:

image

Now you are taken to a page called ‘Add your button code to your webpage’ which is handy, as that’s what we want to do. You’ll see a box with a ‘Website’ tab, what you want to do is copy that code and paste it into your ‘Description’ of your competition:

image

(Where the red arrow is)

image

Which when you save will give you this on your competition page:

image

The competitor can now press the ‘Buy Now’ button, and PayPal deals with the rest.

Add To Cart

Add To Cart is most appropriate for a multiple-class competition, where competitors can enter in multiple classes, or where you need to have optional extras such as ‘day insurance’.

It’s a very similar process to the one above, you can decide to have one button per price point, so you might have a ‘First Class’ button where the price is £10 then a second button for subsequent classes, which is set at £5, the choice as they say is yours (though please email me if you want advice on what to do, I’ll be more than happy to help!).

In this case – you’ll add multiple buttons using the same approach as you would for the ‘Buy Now’ button. The only extra thing you need to do is create a ‘View Cart’ button, which you can see as an option at the bottom of the page when you ‘Create’ your cart button:

image

This doesn’t really have any options, and is a straight copy/paste job.
Tournr Tips #7 – Embedding things

The description part of a competition can be more than plain text, it actually uses a type of text entry called ‘MarkDown’ (you can find out more about that by clicking on that link), which is becoming a standard in forums and messaging boards. It allows you to put bullets, headings etc, but without having to learn HTML.

One of the nice things about that is that you aren’t restricted to just text, you can embed other things, such as YouTube videos, Vimeo.

How?

This demo is with YouTube, but the same principle exists for pretty much all the media sites, if you have difficulty, please feel free to email me via the site and I’ll get you working!

First, let’s find the video we want to embed, for demo purposes I’ve gone with the Shoreline Triathlon (see it here: https://www.youtube.com/watch?v=jCHwieXHhrY). What we need is the embed code. To get that, go to the video page, and click on the ‘Share’ link:

image

Next, choose the ‘Embed’ option:

image

Below this, you have some options you can play around with, I’d stick with the default settings, but feel free to play around with the video size.

When you’re all happy, select the code in the text box (it should begin <iframe), right click on it (or whatever the equivalent is in the Mac world) and select ‘Copy’:

image

Go to your Competition on Tournr, and Select Edit:

image

In the ‘description’ field, paste the code you just copied from YouTube.

image

Save your tournament:

image

And now you have your video in the competition!

image

Recap

Look for the ‘Share’ link on a page you want to show in Tournr, look for the Embed code and copy and paste it into the description field of your Competition.

By the way – this will also work for Groups, Terms and Conditions etc, which is pretty cool!